Monday, December 19, 2011

~ cupcakes square ~

What do you think?  Does it look like cupcakes?  This is the same pattern as the ice cream cones square.  :)

The pattern is here:

http://hooksandyarns.blogspot.com/2011/07/4-heart-square.html
Print Friendly and PDF

Friday, December 16, 2011

~ ice cream cones square ~

What do you think?  Does it look like ice cream cones?  I bought the Impeccable yarn from Michael's - it's called 'neopolitan'.  :)


The pattern is here:


Print Friendly and PDF

Saturday, December 10, 2011

~ Christmas wreath ~


Materials:
- 2 1/2 oz. green 4-ply worsted weight acrylic
- 3/4 oz. white novelty yarn (I used Bernat Boa)
- J hook
- 6" diameter plastic ring

Size:  approximately 9 1/2" across

Directions:
Rnd 1:  Join green with a sc around ring, continue to sc around ring to completely cover.  Join with a sl st to 1st sc.

Rnd 2:  Ch 1, sc in same st as joining st, ch 2.  *sc in next sc, ch 2.  Repeat from * around.  Join as before.

Rnd 3:  Sl st into ch-2 space, (ch 3, 2 dc) in same space.  3 dc in each ch-2 space around.  Join with a sl st to top of ch 3.  

Rnd 4:  Ch 3, dc in same st as joining st.  2 dc in each dc around.  Join with a sl st to top of ch 3, ch 8, sl st in same st as joining.  End off.

Rnd 5:  With white novelty yarn, join with a sc to 2nd dc.  Sc in each sc around.  Ch 1 to skip loop, join with a sl st to 1st sc.  End off.

- decorate as you'd like

***Debi Y's version***  

Print Friendly and PDF

Tuesday, December 6, 2011

~ kitchen towel looper ~

Materials:
- small amount 4-ply worsted weight acrylic
- heart shaped kids bracelet (I bought mine at the dollar store)
- I hook
- one 3/4" button

Size:  crochet part (not including loop) is 2" x 7"

Note:
- the ch 4 counts as a dc and ch 1 space.

Directions:
Row 1:  Join with a sc around bracelet.  Work 6 more sc around bracelet.  Ch 4, turn.  (7 sc)

Row 2:  Skip next 2 sc, 3 dc in next sc, ch 1, skip next 2 sc, dc in last sc.  Ch 3, turn.

Row 3:  Dc in each ch space and dc across.  Ch 4, turn.

Rows 4 - 13:  Repeat Rows 2 - 3.  At end of Row 13, do not ch 4, chain only 1 and turn.

Row 14:  Sc 1st and 2nd dc together, sc in next dc, (sc, ch 7, sc) in next dc, sc in next dc, sc next dc and ch 3 (which is the last dc) together.  End off.

- sew button to Row 3.

***Debi Y's version***

Print Friendly and PDF

Tuesday, November 29, 2011

~ an icicle ~

Materials:
- small amount white 4-ply worsted weight acrylic
- I hook

Size:  6" long

Directions:
Rnd 1:  Ch 4, 2 dc in 4th ch from hook, ch 2.  *3 dc in same ch, ch 2.  Repeat from * 2 more times.  Join with a sl st to top of ch 3.  Ch 1, turn.

Rows 2 - 4:  Sl st over to ch-2 space.  (ch 3, 2 dc, ch 2, 3 dc) in same space.  Ch 1, turn.

Rows 5 - 6:  Sl st over to ch-2 space.  (ch 3, 1 dc, ch 2, 2 dc) in same space.  Ch 1, turn.

Row 7:  Sl st over to ch-2 space.  Ch 5, sl st in 3rd ch from hook, ch 3, sl st in ch-2 space.  End off.

***Debi Y's pattern***
Print Friendly and PDF

Monday, November 28, 2011

~ Darrell's hexagon ~

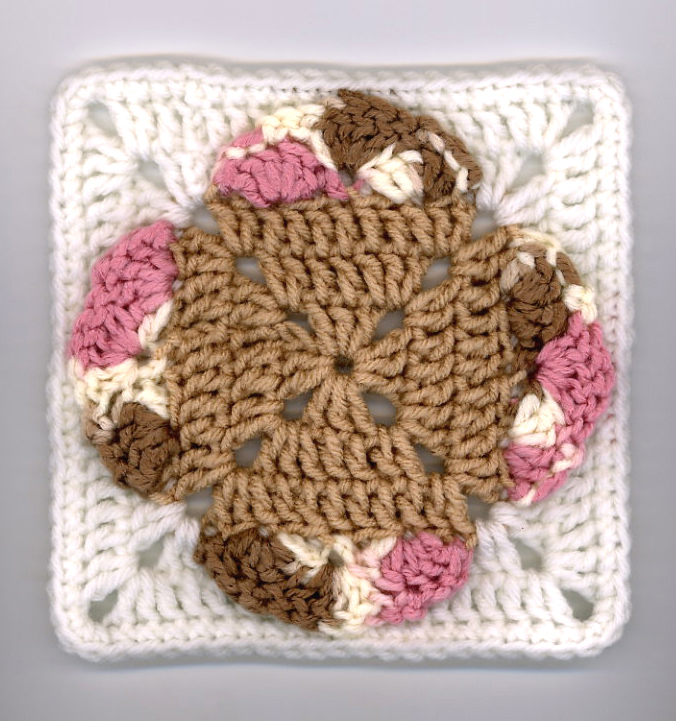
I crocheted this hexagon while waiting with my brother Darrell at the Dr's office.

~~~~~

Materials:
- 4-ply worsted weight acrylic
- I hook

Size:  6"

Notes:
- I crochet tight so you may need to adjust the size of your crochet hook
- the 2 chains at the beginning of Rnd 1 does not count as a st

Directions:
Rnd 1:  Ch 3, 12 dc in 3rd ch from hook.  Join with a sl st to 1st dc.  (12 dc)

Rnd 2:  Ch 3, dc in same st, *ch 2, 2 dc in next 2 dc.  Repeat from * 4 more times.  Ch 2, 2 dc in next dc.  Join with a sl st to top of ch 3.  (24 dc and 6 ch-2 spaces)

Rnd 3:  Ch 3, *skip next dc, (2 dc, ch 2, 2 dc) in ch-2 space, skip next dc, dc in next 2 dc.  Repeat from * 4 more times.  Skip next dc, (2 dc, ch 2, 2 dc) in ch-2 space, skip next dc, dc in next dc.  Join as before.

Rnd 4:  Ch 3, dc in next dc, *skip next dc, (3 dc, ch 2, 3 dc) in ch-2 space, skip next dc, dc in next 4 dc.  Repeat from * 4 more times.  Skip next dc, (3 dc, ch 2, 3 dc) in ch-2 space, skip next dc, dc in next 2 dc.  Join as before.

Rnd 5:  Ch 3, dc in next 2 dc, *skip next 2 dc, (3 dc, ch 2, 3 dc) in ch-2 space, skip next 2 dc, dc in next 6 dc.  Repeat from * 4 more times.  Skip next 2 dc, (3 dc, ch 2, 3 dc) in ch-2 space, skip next 2 dc, dc in next 3 dc.  Join as before.  End off.

***Debi Y's pattern***

Print Friendly and PDF

Friday, November 18, 2011

~ child's gingerbread boy scarf ~


Materials:
- 4 1/4 oz. brown worsted weight acrylic (I used Red Heart Soft)
- small amount red worsted weight acrylic
- small amount white picot ribbon
- two 3/4" black buttons
- three 3/4" white buttons
- I crochet hook

Size:  5" x 42"

Notes:
- I crochet tight so you may want to adjust the size of your crochet hook
- ch 2 at beginning of Rnds 1 thru 5 do not count as a stitch

Directions:
Rnd 1:  Ch 3, 12 in 3rd ch from hook.  Join with a sl st to 1st dc.  (12 dc)

Rnd 2:  Ch 2, 2 dc in each dc around.  Join as before.  (24 dc)

Rnd 3:  Ch 2, 2 dc in same dc, dc in next dc.  *2 dc in next dc, dc in next dc.  Repeat from * around.  Join as before.

Rnd 4:  Ch 2, 2 dc in same dc, dc in next 2 dc.  *2 dc in next dc, dc in next 2 dc.  Repeat from * around.  Join as before.

Rnd 5:  Ch 2, 2 dc in same dc, dc in next 3 dc.  *2 dc in next dc, dc in next 3 dc.  Repeat from * around.  Join as before.

Row 6:  Ch 3, dc in same dc.  Dc in next 14 dc.  2 dc in next dc.  Ch 3, turn.  (18 dc)

Rows 7 - 79:  Dc in each dc across, dc in top of ch 3.  Ch 3, turn.

for 1st leg:
Row 80:  Dc in next 7 dc.  Ch 3, turn. 

Rows 81 - 83:  Dc in each dc across, dc in top of ch 3.  Ch 3, turn.

Row 84:  Dc in each dc across, dc in top of ch 3.  Ch 2, turn.

Row 85:  Dc in next dc (the ch 2 and this 1st dc count as a dc decrease).  Dc in next 4 dc.  Dc last 2 dc together.  Ch 2, turn.

Row 86:  Dc in next dc (the ch 2 and this 1st dc count as a dc decrease).  Dc in next 2 dc.  Dc last 2 dc together.  End off.

For 2nd leg:
Row 80:  Skip next 4 dc on Row 79 (right after the 1st leg), join with a sl st to next dc.  Ch 3, dc in the next 7 dc.  Ch 3, turn.

Rows 81 - 86:  Repeat Rows 81 - 86 of 1st leg.

for right arm: 
Row 1:  Join with a sl st around the last dc of Row 11.  Ch 3, 2 dc around the same dc.  2 dc around the last dc of Row 10.  3 dc around the last dc of Row 9.  Ch 3, turn.

Rows 2 - 7:  Repeat Rows 81 - 86 of 1st leg.

for left arm:
Row 1:  Join with a sl st around the last dc of Row 9.  Ch 3, 2 dc around the same dc.  2 dc around the last dc of Row 10.  3 dc around the last dc of Row 11.  Ch 3, turn. 

Rows 2 - 7:  Repeat Rows 81 - 86 of 1st leg.

- sew on black buttons for eyes

- sew mouth with red yarn

- sew on white buttons to front of gingerbread boy as shown in photo

- sew or glue white picot ribbon to each arm and leg

***Debi Y's idea***
Print Friendly and PDF

Monday, November 14, 2011

~ candles ~


I made these candles this morning - they're very quick and easy to do. 

All you need to create a nice gift for someone is the following:


The candle gel, candle scents, and wicks (if preferred) can be purchased from your local craft store.  I bought this candle gel from QVC years ago.  (For my Jewish friends - I mean no disrespect by using Chanukah candles).  Plus you'll need glass mugs and small heat resistent items - such as glass gems and small stones.  Those 3 items can be purchased from your local Dollar Tree.  (Sorry - I forgot to add those to the picture).

Fill your glass mug with the glass gems or the stones, insert one of the Chanukah candles (or a regular wick you bought from the craft store) in the middle, follow the directions for heating the candle gel, add the scent and then pour the liquid into the glass mug.  Let it cool and there you have it - a pretty candle. 

I have to warn you that making these candles is addicting.  My next purchase from the Dollar Tree will include more glass mugs.  :)     
Print Friendly and PDF

Thursday, November 3, 2011

~ a baby crooked ripple ~


**This pattern is along the same lines as the first 'a crooked ripple' - the ripple points are just smaller.**

Materials:
- sport yarn
- I crochet hook

Size:  35" wide

Directions:
Row 1:  Ch 161, dc in 4th ch from hook, dc in next 3 chs.  (dc, ch 1, dc) in next ch, dc in next 5 chs.  Skip next 2 chs.  Dc in next 3 chs, (dc, ch 1, dc) in next ch, dc in next 3 chs.  Skip next 2 chs.  Dc in next 7 chs, (dc, ch 1, dc) in next ch, dc in next 7 chs.  Skip next 2 chs.  Dc in next 3 chs, (dc, ch 1, dc) in next ch, dc in next 3 chs.  Skip next 2 chs.  Dc in next 7 chs, (dc, ch 1, dc) in next ch, dc in next 7 chs.  Skip next 2 chs.  Dc in next 7 chs, (dc, ch 1, dc) in next ch, dc in next 7 chs.  Skip next 2 chs.  Dc in next 3 chs, (dc, ch 1, dc) in next ch, dc in next 3 chs.  Skip next 2 chs.  Dc in next 5 chs, (dc, ch 1, dc) in next ch, dc in next 5 chs.  Skip next 2 chs.  Dc in next 7 chs, (dc, ch 1, dc) in next ch, dc in next 7 chs.  Skip next 2 chs.  Dc in next 3 chs, (dc, ch 1, dc) in next ch, dc in next 3 chs.  Skip next 2 chs.  Dc in next 3 chs, (dc, ch 1, dc) in next ch, dc in next 3 chs.  Skip next 2 chs.  Dc in next 5 chs, (dc, ch 1, dc) in next ch, dc in next 5 chs.  Skip next 2 chs.  Dc in next 3 chs, (dc, ch 1, dc) in next ch, dc in next 3 chs.  Turn.

Row 2:  Sl st in next dc, ch 3.  Dc in next 2 dc, (dc, ch 1, dc) in ch 1 space, dc in next 3 dc.  Skip next 2 dc.  Dc in next 5 dc, (dc, ch 1, dc) in ch 1 space, dc in next 5 dc.  Skip next 2 dc.  Dc in next 3 dc, (dc, ch 1, dc) in ch 1 space, dc in next 3 dc.  Skip next 2 dc.  Dc in next 3 dc, (dc, ch 1, dc) in next dc, dc in next 3 dc.  Skip next 2 dc.  Dc in next 7 dc, (dc, ch 1, dc) in ch 1 space, dc in next 7 dc.  Skip next 2 dc.  Dc in next 5 dc, (dc, ch 1, dc) in ch 1 space, dc in next 5 dc.  Skip next 2 dc.  Dc in next 3 dc, (dc, ch 1, dc) in ch 1 space, dc in next 3 dc.  Skip next 2 dc.  Dc in next 7 dc, (dc, ch 1, dc) in ch 1 space, dc in next 7 dc.  Skip next 2 dc.  Dc in next 7 dc, (dc, ch 1, dc) in ch 1 space, dc in next 7 dc.  Skip next 2 dc.  Dc in next 3 dc, (dc, ch 1, dc) in ch 1 space, dc in next 3 dc.  Skip next 2 dc.  Dc in next 7 dc, (dc, ch 1, dc) in ch 1 space, dc in next 7 dc.  Skip next 2 dc.  Dc in next 3 dc, (dc, ch 1, dc) in ch 1 space, dc in next 3 dc.  Skip next 2 dc.  Dc in next 5 dc, (dc, ch 1, dc) in ch 1 space, dc in next 5 dc.  Turn. 

Row 3:  Sl st in next dc, ch 3.  Dc in next 4 dc, (dc, ch 1, dc) in ch 1 space, dc in next 5 dc.  Skip next 2 dc.  Dc in next 3 dc, (dc, ch 1, dc) in ch 1 space, dc in next 3 dc.  Skip next 2 dc.  Dc in next 7 dc, (dc, ch 1, dc) in ch 1 space, dc in next 7 dc.  Skip next 2 dc.  Dc in next 3 dc, (dc, ch 1, dc) in ch 1 space, dc in next 3 dc.  Skip next 2 dc.  Dc in next 7 dc, (dc, ch 1, dc) in ch 1 space, dc in next 7 dc.  Skip next 2 dc.  Dc in next 7 dc, (dc, ch 1, dc) in ch 1 space, dc in next 7 dc.  Skip next 2 dc.  Dc in next 3 dc, (dc, ch 1, dc) in ch 1 space, dc in next 3 dc.  Skip next 2 dc.  Dc in next 5 dc, (dc, ch 1, dc) in ch 1 space, dc in next 5 dc.  Skip next 2 dc.  Dc in next 7 dc, (dc, ch 1, dc) in ch 1 space, dc in next 7 dc.  Skip next 2 dc.  Dc in next 3 dc, (dc, ch 1, dc) in ch 1 space, dc in next 3 dc.  Skip next 2 dc.  Dc in next 3 dc, (dc, ch 1, dc) in ch 1 space, dc in next 3 dc.  Skip next 2 dc.  Dc in next 5 dc, (dc, ch 1, dc) in ch 1 space, dc in next 5 dc.  Skip next 2 dc.  Dc in next 3 dc, (dc, ch 1, dc) in ch 1 space, dc in next 3 dc.  Turn.

Repeat Rows 2 & 3 until desired length.

***Debi Y's version***
Print Friendly and PDF

Monday, October 24, 2011

~ wiggles square for SIBOL ~

**This square will be used for a SIBOL blanket challenge around the beginning of December**
Materials:
- 4-ply worsted weight yarn (I used RHSS for the base piece and Herrschner's Worsted 8 for the wiggles)
- I hook

Size:  6"

Note:  I crochet tight so you may need to adjust the size of your crochet hook.

Directions:
Rnd 1:  Ch 4, 2 dc in 4th ch from hook, ch 2.  *3 dc in same ch, ch 2.  Repeat from * 2 more times.  Join with a sl st to top of ch 3. 

Rnd 2:  Sl st in next dc, ch 4, skip next dc, *(dc, ch 1, dc, ch 2, dc, ch 1, dc) in ch-2 space.  Ch 1, skip next dc, dc in next dc, ch 1, skip next dc.  Repeat from * 3 more times.  Join with a sl st to 3rd ch of beginning ch 4.  

Rnd 3:  Ch 3, dc in each dc and ch-1 space around with (dc, ch 2, dc) in each corner ch-2 space.  Join with a sl st to top of ch 3.  

Rnd 4:  Ch 4, skip next dc, dc in next dc, ch 1, skip next dc, dc in next dc, ch 1.  *(dc, ch 1, dc, ch 2, dc, ch 1, dc) in corner ch-2 space.  {ch 1, skip next dc, dc in next dc} 5 times.  Ch 1.  Repeat from * 2 more times.  (dc, ch 1, dc, ch 2, dc, ch 1, dc) in next corner ch-2 space.  {ch 1, skip next dc, dc in next dc} 2 times.  Ch 1, join with a sl st to 3rd ch of beginning ch 4.

Rnd 5:  Repeat Rnd 3.

Rnd 6:  Ch 1, sc in same st.  Sc in each dc around with (sc, ch 1, sc) in each corner ch-2 space.  Join with a sl st to 1st sc.  End off.

For wiggles:
Join any color with a sl st around any dc, ch 3, 3 dc around same dc.  *Turn piece counter-clockwise, 4 dc around next dc.  Turn piece clockwise, 4 dc around next dc.  Repeat from * around.  Join with a sl st to top of beginning ch 3.  End off.


***Debi Y's pattern***
  
Print Friendly and PDF

Sunday, October 23, 2011

~ 7-11 ripple scarf ~

Materials:
- 5 1/2 oz. worsted weight acrylic
- J hook
- buttons

Size:  4 1/2" x 72 1/2"

Note:
- Although gauge doesn't really matter, I crochet tight so you may want to adjust the size of your crochet hook
- the ch 3 is included as a dc

Directions:
Row 1:  Ch 283, dc in 4th ch from hook, dc in next 9 chs.  *skip next 2 chs, dc in next 7 chs.  (dc, ch 2, dc) in next ch.  Dc in next 7 chs.  Skip next 2 chs, dc in next 11 chs.  Repeat from * across.  Ch 3, turn.

Rows 2 - 8:  Dc in next 10 dc.  *skip next dc, dc in next 7 dc.  (dc, ch 2, dc) in ch-2 space.  Dc in next 7 dc.  Skip next dc, dc in next 11 dc.  Repeat from * across.  Ch 3, turn.  At end of Row 8, end off.

For fringe:  cut 64 11" strands - use 4 strands for each fringe.  Fold in half and using the larks head knot (http://www.free-macrame-patterns.com/larks-head-knot.html), apply fringe to each dc along the short side. 

Sew on buttons.  (gluing them down first with fabric glue will make sewing easier)


***Debi Y's version***
Print Friendly and PDF

Friday, October 21, 2011

~ kitchen rug finished ~

Finally finished up my new kitchen rug yesterday.  I glued the foamy kind of shelf liner to the back to keep it from sliding around.  My son Bobby says "it pulls the whole room together" - a line from the movie "The Big Lebowski" - and my grandson William was afraid to step on it.  :)

 
Print Friendly and PDF

Monday, September 26, 2011

~ a crooked ripple ~

~ this picture shows how the pattern is written ~


Materials:
- 4-ply worsted weight acrylic (I'm using Red Heart Super Saver)
- J hook

Size:  the pattern for this blanket is written for it to be 40" wide - The length of the blanket depends on how long you would want 
your blanket to be - just keep crocheting until you have it as long as
 you want it. The way I have the blanket pictured above, it 
measures 23" wide x 40" tall. :)

Directions:
Row 1:  Ch 158, dc in the 4th ch from hook.  Dc in next 5 chs.  (dc, ch 2, dc) in next ch.  Dc in next 7 chs.  Skip next 2 chs.  Dc in next 11 chs.  (dc, ch 2, dc) in next ch.  Dc in next 11 chs.  Skip next 2 chs.  Dc in next 20 chs.  (dc, ch 2, dc) in next ch.  Dc in next 20 chs.  Skip next 2 chs.  Dc in next 7 chs.  (dc, ch 2, dc) in next ch.  Dc in next 7 chs.  Skip next 2 chs.  Dc in next 7 chs.  (dc, ch 2, dc) in next ch.  Dc in next 7 chs.  Skip next 2 chs.  Dc in next 18 chs.  (dc, ch 2, dc) in next ch.  Dc in next 18 chs.  Turn.

Row 2:  Sl st into next dc, ch 3.  Dc in next 17 dc.  (dc, ch 2, dc) in next ch-2 space.  Dc in next 18 dc.  Skip next 2 dc.  Dc in next 7 dc.  (dc, ch 2, dc) in next ch-2 space.  Dc in next 7 dc.  Skip next 2 dc.  Dc in next 7 dc.  (dc, ch 2, dc) in next ch-2 space.  Dc in next 7 dc.  Skip next 2 dc.  Dc in next 20 dc.  (dc, ch 2, dc) in next ch-2 space.  Dc in next 20 dc.  Skip next 2 dc.  Dc in next 11 dc.  (dc, ch 2, dc) in next ch-2 space.  Dc in next 11 dc.  Skip next 2 dc.  Dc in next 7 dc.  (dc, ch 2, dc) in next ch-2 space.  Dc in next 7 dc.  Turn.

Row 3:  Sl st into next dc, ch 3.  Dc in next 6 dc.  (dc, ch 2, dc) in next ch-2 space.  Dc in next 7 dc.  Skip next 2 dc.  Dc in next 11 dc.  (dc, ch 2, dc) in next ch-2 space.  Dc in next 11 dc.  Skip next 2 dc.  Dc in next 20 dc.  (dc, ch 2, dc) in next ch-2 space.  Dc in next 20 dc.  Skip next 2 dc.  Dc in next 7 dc.  (dc, ch 2, dc) in next ch-2 space.  Dc in next 7 dc.  Skip next 2 dc.  Dc in next 7 dc.  (dc, sh 2, dc) in next ch-2 space.  Dc in next 7 dc.  Skip next 2 dc.  Dc in next 18 dc.  (dc, ch 2, dc) in next ch-2 space.  Dc in next 18 dc.  Turn.

Repeat Rows 2 and 3 until desired length.

***Debi Y's pattern***

Print Friendly and PDF

Tuesday, September 20, 2011

~ wiggles preemie baby blankie ~

Materials:
- 4-ply worsted weight acrylic (I used Herrschners Worsted 8)
   - 8 oz. off-white for blanket
   - various colors for wiggles
- I hook

Size:  21" x 24"

Notes: 
- I crochet tight so you may need to adjust the size of your hook
- you can make this blanket any size you would like - just make sure to chain an odd number of chains

Directions:
Row 1:  With off-white ch 95, dc in 4th chain from hook.  Dc in each ch across.  Turn.  (93 dc)

Rows 2 - 3:  Ch 3, dc in each dc across, dc in top of beginning ch 3.  Turn.

Row 4:  Ch 4, skip next dc, dc in next dc.  *ch 1, skip next dc, dc in next dc.  Repeat from * across.  Turn.

Row 5:  Ch 3, dc in each dc and ch 1 space across.  Dc in 3rd ch of beginning ch 4.  Turn.

Rows 6 - 7:  Ch 3, dc in each dc across, dc in top of beginning ch 3.  Turn.

Rows 8 - 39:  Repeat Rows 4 - 7.  At end of Row 39, end off.

- for wiggles (on dc, ch 1 rows):

Join color with a sl st around 1st st, 3 dc around same st.  *Turn, 4 dc around next st.  Repeat from * across.  End off.


- for edging:

Join off-white with a sc in any corner, (ch 2, sc) in same corner. Sc evenly around with (sc, ch 2, sc) in each corner stitch, and a ch 3 to skip a wiggles row.


***Debi Y's pattern***
Print Friendly and PDF

Sunday, September 18, 2011

~ a round wiggles pillow ~


After 3 tries I finally got it.  Now all I have to do is get a pillow form and stuff it.  :) 

Materials:
- 4-ply worsted weight acrylic 
   - 4 oz. for the base (I used Red Heart Super Saver)
   - wiggly colors (I used Herrschners Worsted 8 - I didn't weigh the amounts because you can choose to use all one color or different colors for each wiggle.  I would guess though, that the last wiggle round was no more than 2 oz.)
- J hook

Size:  13" across

Notes:
- I crochet tight so you may need to adjust the size of your crochet hook
- the base piece will ruffle but will straighten out when the wiggles are crocheted

Directions:
For base (make 2):

Rnd 1:  Ch 4, 11 dc in 3rd ch from hook.  Join with a sl st to top of beginning ch 3.  (12 dc)

Rnd 2:  Ch 4, dc in next dc, ch 1.  *dc in next dc, ch 1.  Repeat from * around.  Join to 3rd ch of beginning ch 4.

Rnd 3:  Ch 3, dc in same st.  2 dc in each st around.  Join with a sl st to top of beginning ch 3.

Rnd 4:  Ch 4, skip next dc, dc in next dc, ch 1.  *skip next dc, dc in next dc, ch 1.  Repeat from * around.  Join with a sl st to 3rd ch of beginning ch 4. 

Rnd 5:  Ch 3, dc in same st, dc in next st.  *2 dc in next st, dc in next st.  Repeat from * around.  Join with a sl st to top of beginning ch 3.

Rnd 6:  Repeat Rnd 4.

Rnd 7:  Repeat Rnd 5.

Rnd 8:  Repeat Rnd 4.

Rnd 9:  Ch 3, dc in same st, dc in next 2 sts.  *2 dc in next dc, dc in next 2 sts.  Repeat from * around.  Join with a sl st to top of beginning ch 3.

Rnd 10:  Repeat Rnd 4.

Rnd 11:  Ch 1, 2 sc in same st, sc in next 3 sts.  *2 sc in next st, sc in next 3 sts.  Repeat from * around.  Join with a sl st to 1st sc.  End off.  

For wiggles:
Join any color with a sl st around any dc, ch 3, 3 dc around same dc.  *turn work, 4 dc around the next dc.  Repeat from * all around.  Join with a sl st to top of beginning ch 3.  End off.


**these pictures do not show the correct base pattern - they are only to show how to do the wiggles**

***Debi Y's pattern***
Print Friendly and PDF

Wednesday, September 14, 2011

~ seeing spots ~

When Tracie at 'CroCreations' saw my crochet hooks, she was inspired to create some of her own.  I have only created swirly handles, but when I saw Tracie's polka dot hooks, I was inspired to try to create one. 


I have to tell you that doing polka dots is kind of tricky.  Mine did not stay perfectly round.  But that's ok - I like it anyway.  In fact, I think this is my new 'favorite' hook.  It's a Susan Bates size 'J'. 

And speaking of Susan Bates - I bought 2 new hooks (plus some Red Heart Soft yarn) from Herrschners and they are different.  The head of the hook is not pointy like it used to be - they are rounded - and the actual hook part is smaller.  I hope I won't have trouble trying to hook the yarn when I'm crocheting.

 **eta - I have been using this hook for a while now and I have had absolutely no problems crocheting with it.  (I haven't tried a tight sc pattern (like amigurumi) - there might be a problem there since there is no point to help push thru the stitch.)   
Print Friendly and PDF

Tuesday, September 13, 2011

~ Hook reminders ~


Eileen from 'Crochet Attic' posted her progress on the pretty granny stripe she's working on and she asked a question.  The question is:  "do any of you ever set a project aside and when you go back to it you can't remember which hook you were using?" 

Nowadays, I'm lucky if I remember what I had for breakfast.  I forget alot of stuff and have to make notes all the time.  My solution to the hook problem is I'm sure, not a new one.  I take safety pins and letter beads and pin it to a project if I put that project down for a time.  I also use this for my scrap yarn cakes when I wind them - 'A' for the 1st one, 'B' for the second one, and so on.  This has saved me from alot of aggravation.  :)   
Print Friendly and PDF

Thursday, September 8, 2011

~ cupcake (?) bottle cozy ~

I asked my husband and my son what they thought this bottle cozy looked like.  My husband said "I -- don't -- know"  --  my son said "umm -- a cupcake?".  I'm not too sure myself.  It's supposed to look like a cupcake.  What do you think?

Materials:
- 4-ply worsted weight yarn - I used acrylic but you can use cotton if you'd like
   - brown (or light gold)
   - pink (or Red Heart Fiesta white)
   - red
- J hook

Size:  fits an 8 oz. bottle

Notes:
- I crochet tight so you may need to adjust the size of your crochet hook
- Ch 2 at beginning of Rnds does not count as a stitch
- beginning PC stitch:  ch 3, 2 dc in same stitch, drop loop from hook, insert hook in top of ch 3 and in 3rd dc, yarn over, pull through
- PC stitch:  3 dc in same stitch, drop loop from hook, insert hook in 1st dc and in 3rd dc, yarn over, pull through

Directions:
Rnd 1:  With brown (or light gold) ch 3, 12 dc in 3rd ch from hook.  Join with a sl st to 1st dc.  (12 dc)

Rnd 2:  Ch 2, 2 dc in each dc around.  Join as before.  (24 dc)

Rnd 3:  Ch 1, 2 sc in same dc.  Sc in next 5 dc.  *2 sc in next dc, sc in next 5 dc.  Repeat from * around.  Join with a sl st to back loop of 1st sc.  

Rnd 4:  Working this Rnd in back loops only, ch 1, sc in each sc around.  Join with a sl st to 1st sc.

Rnd 5:  Ch 2, dc in each sc around.  Join with a sl st to 1st dc.  (28 dc)

Rnds 6 - 8:  Ch 3, front post dc (fp dc) around next dc.  *dc in next dc, fp dc around next dc.  Repeat from * around.  Join as before.  At end of Rnd 8, end off.

Rnd 9:  Join pink (or Red Heart Fiesta white) with a sc in 1st dc.  Sc in each dc and fp dc around.  Join with a sl st to 1st sc.

Rnd 10:  Beginning PC in 1st sc, ch 1, skip next sc.  *PC in next sc, ch 1, skip next sc.  Repeat from * around.  Join with a sl st to 1st PC.

Rnds 11 - 12:  Beginning PC in 1st PC, ch 1.  *PC in next PC, ch 1.  Repeat from * around.  Join as before.  At end of Rnd 12, end off  - or if not using the red then DO NOT END OFF.  Continue on to Rnd 13.

Rnd 13:  Join red (or continue with Red Heart Fiesta white) with a sc in 1st PC.  Sc in each ch 1 space and PC around.  Join with a sl st to 1st sc.  DO NOT END OFF.

For handle:  Ch 1, sc in same sc.  *ch 3, dc in 3rd ch from hook.  Repeat from * until desired length.  Skip next 13 sc on Rnd 13, sc in next sc, sl st in same sc, end off.


For trim:  holding piece upside down, join pink (or Red Heart Fiesta white) with a sc in front loop of any skipped sc on Rnd 10, (dc, sc) in same sc.  (sc, dc, sc) in the front loop of each skipped sc around.  Join with a sl st to 1st sc, end off.  

***Debi Y's version***  
Print Friendly and PDF

Tuesday, August 23, 2011

~ granny's cabin square ~

Inspired by my friend Heather at 'The Good Life' who's crocheting a log cabin afghan, I crocheted this 'granny's cabin square'.


Materials:
- 4-ply worsted weight acrylic
- J hook

Directions:

Crochet a 3 round granny square - make sure you only chain 2 for the corners and only chain 1 in between the 3 dc clusters.

1st side: 
Row 1:  join light blue with a sc in corner space, sc in each sc and ch 1 space across, sc in corner space.  Ch 1, turn.

Rows 2 - 5:  sc in each sc across.  Ch 1, turn.  At end of Row 5, end off.

2nd side:
Row 1:  join mint green with a sc in side of 1st light blue sc.  Work 4 more sc along the side of the light blue.  Sc in corner space,  sc in each sc and ch 1 space across, sc in corner space.  Ch 1, turn.

Rows 2 - 5:  Repeat Rows 2 - 5 of 1st side.

3rd side:
Row 1:  join dark pink with a sc in side of 1st mint green sc.  Work 4 more sc along the side of the mint green.  Sc in corner space, sc in each sc and ch 1 space across, sc in corner space.  Ch 1, turn.

Rows 2 - 5:  Repeat Rows 2 - 5 of 1st side.

4th side:
Row 1:  join purple with a sc in side of 1st dark pink sc.  Work 4 more sc along the side of the dark pink.  Sc in corner space, sc in each sc and ch 1 space across, sc in corner space.  Work 5 along the side of the light blue.  Ch 1, turn.

Rows 2 - 5:  Repeat Rows 2 - 5 of 1st side.

***Debi Y's pattern***

Print Friendly and PDF

Friday, August 5, 2011

~ straight up granny ~

After I finished my granny ripple bag, I wanted to start another baby blankie.  I wanted to do a granny stitch, so I went and got my Jan Eaton book "200 Crochet Blocks" and found her 'granny stripes' pattern.  I love Jan Eaton's patterns, but the edges weren't working for me, so I figured a different way.  Also - I'm not working stripes, so I decided to call this baby blankie 'straight up granny'.  I hope it all makes sense.  If you have any questions let me know.  :)

**Please note that I am not claiming this pattern as my own - it belongs to Jan Eaton - I only changed the way the edges are.

 Repeat Rows 2 and 3 for pattern.
Print Friendly and PDF

Saturday, July 30, 2011

~ 4-hearts square (ice cream & cupcakes too) ~

I wanted to try and come up with a heart square but I couldn't get it to work the way I wanted.  I only wanted 1 heart.  I was able to figure out this 4 hearts square though.  I sat down and came up with this pattern all on my own, but it does seem familiar - have any of you ladies & gentlemen ever seen a square like this before?  If you have, could you please let me know.  Thanks so much.  :)
**this square measures 5 3/4" - I crocheted it with RHSS and I used a 'J' hook.


~~The Butterfly Bush Diaries left me a comment saying that this reminded her of a clover.  A few of these squares crocheted in green would make nice potholders for St. Patrick's day. 

Materials:
- 4-ply worsted weight acrylic
   - pink
   - white
- J hook

Size:  Rnds 1 - 5 is approximately 5 3/4" but you can always add more rnds.

Notes:
- I crochet tight so you may need to adjust the size of your crochet hook.

Directions:
Rnd 1:  With pink ch 4, 2 dc in 4th ch from hook, ch 2.  (3 dc, ch 2, in same ch) 3 more times.  Join with a sl st to top of beginning ch.

Rnds 2 - 3:  Ch 3, dc in each dc around with (2 dc, ch 2, 2 dc) in corner ch-2 spaces.  For Rnd 2, join with a sl st to top of beginning ch 3.  For Rnd 3, join with a sl st to back loop of the top of beginning ch 3.  End off.

Rnd 4:  Join white with a sl st to any corner space, (ch 3, 1 dc, ch 2, 2 dc) in same space.  Dc in the back loops of each dc across.  Work (2 dc, ch 2, 2 dc) in each corner space.  Join with a sl st to top of beginning ch 3.


Rnd 5:  Ch 3, dc in each dc around with (2 dc, ch 2, 2 dc) in each corner space around.  Join as before. 

~~you can end off here or continue to make the square any size that you would like

For heart tops:

Join pink with a sl st to 1st front loop on any side of Rnd 3.  *skip next front loop, 3 dc in each of next 2 front loops, skip next front loop, sl st in next front loop.  Repeat from * 1 more time.  End off.

Repeat for next 3 sides.  Tack down heart tops.


***Debi Y's pattern***
~~~~~


~ ice cream cones square ~

Rnds 1 - 3:  with brown, follow Rnds 1 - 3 of '4 hearts square' pattern.

Rnds 4 - 5:  with soft white, follow Rnds 4 - 5 of '4 hearts square' pattern.

- you can add a rnd of sc if you'd like.

For ice cream tops:

Row 1:  join your color choice with a sl st to 1st front loop on any side of Rnd 3, skip next front loop, 5 dc in next front loop, skip next 2 front loops, sc in next front loop, skip next 2 front loops, 5 dc in next front loop, skip next front loop, sl st in last front loop.  Ch 1, turn.

Row 2:  Sl st over to 3rd dc, ch 1, sc in same dc, skip next 2 dc, 5 dc in next sc, skip next 2 dc, sc in next dc, sl st in next 2 dc, sl st in same front loop as beginning sl st of Row 1.  End off.

- tack down tops of ice cream.

~~~~~


~ cupcakes square ~

Rnd 1:  with soft white, follow Rnd 1 of '4 hearts square' pattern.

Rnds 2 - 3:  with brown, follow Rnds 2 - 3 of '4 hearts square' pattern.

Rnds 4 - 5:  with soft white, follow Rnds 4 - 5 of  '4 hearts square' pattern.

- you can add a rnd of sc if you'd like

For cupcake tops:

Rows 1 - 2:  follow Rows 1 - 2 of ice cream tops.

- tack down tops of cupcakes

- I used Sharpie permanent markers to make the sprinkles 

***Debi Y's pattern***

Print Friendly and PDF

Wednesday, July 6, 2011

~ re-post for Heldasland ~


~~this re-post is for you Helda~~

I made my first crochet hook handle in 2002 - I needed more substance to hold in my hand - I was having a problem with having to stop crocheting and stretch out my fingers every once in a while. I thought of tape but I didn't think that that would feel comfortable or look very nice. My next thought was polymer clay. I had a small stash of it leftover from trying to make beads, so I tried it and it worked great.

This is how I create my crochet hook handles:

Step 1: knead the polymer clay to make it more pliable. (by the way, I use Sculpey and Fimo polymer clays)

Step 2: wrap the polymer clay around your crochet hook handle and shape it to your preference. I roll the handle on my dining room table to help smooth it out.

Step 3: bake in a toaster oven at 275* for 15 minutes per 1/4" thickness.

Once you get the gist of creating these handles, you can let your imagination go. My favorite style is swirling 2 or 3 colors together with a glass bead on top. I think they're pretty and they really help out my crocheting hand. :)

***Edited to add a couple of tips:

1. use only metal crochet hooks. I tried a plastic hook once and it drooped down.

2. lay the polymer clay hook on a soft bed of quilt batting.

3. fashion a little tent out of aluminum foil to cover the hook and quilt batting while baking.

~~~~~~~~~~~~~~
Here's the link to the post where there is more instructions:

http://hooksandyarns.blogspot.com/2010/08/my-crochet-hooks.html
Print Friendly and PDF

Sunday, July 3, 2011

~ TMNT bottle cozy ~

I came upon this pattern one day while checking out Crochet Pattern Central - it's a cute coffee cup cozy.  My grandsons like the TMNT's (Teenage Mutant Ninja Turtles) so I thought of them when I first saw it.  The only thing, of course, is that they don't drink coffee - so I crocheted a bottle cozy.  This is the purple one - I think it's Leonardo - he's for James.  I am almost finished with the orange one - Michaelangelo - he's for William.  :)


Materials:
- 4-ply worsted weight acrylic
  - green
  - mask color
- J hook
- pair of 1" wiggle eyes

Size:  fits 16.9 oz. bottle

Notes:
- I crochet tight so you may want to adjust the size of your crochet hook
- The ch 2 at the beginning of the dc rnds does not count as a stitch

Directions:

Rnd 1:  With green, ch 3, 12 dc in 3rd ch from hook.  Join with a sl st to 1st dc.  (12 dc)

Rnd 2:  Ch 2, 2 dc in each dc around.  Join as before.  (24 dc)

Rnd 3:  Ch 1, 2 sc in same st as joining, sc in next 5 dc.  (2 sc in next dc, sc in next 5 dc) 3 more times.  Join with a sl st to 1st sc.  (28 sc)  

Rnd 4:  Working this rnd only in back loops, ch 1, sc in each sc around.  Join as before.  

Rnd 5:  Ch 2, dc in each sc around.  Join with a sl st to 1st dc.

Rnd 6:  Ch 1, sc in each dc around.  Join with a sl st to 1st sc.

Rnds 7 - 10:  Repeat Rnds 5 - 6.

Rnd 11:  Repeat Rnd 5.  End off.

Rnd 12:  Join mask color with a sl st to 1st dc.  Ch 1, sc in each dc around.  Join with a sl st to 1st sc.  

Rnds 13 - 16:  Repeat Rnds 5 - 6.  At end of Rnd 16, end off.

Rnd 17:  Join green with a sl st to 1st sc.  Ch 2, dc in each sc around.  Join with a sl st to 1st dc.

Rnd 18:  Repeat Rnd 6.  End off.

- glue eyes to mask

***Debi Y's pattern***
Print Friendly and PDF

Sunday, June 12, 2011

~ sunglasses case ~


Erica asked me to crochet her a sunglasses case and this is what I came up with.

Materials:
- a little more than 1 oz. 4-ply ww acrylic
- J hook

Size:  4" x 7"

Notes:
- I crochet tight so you may want to adjust the size of your crochet hook
- The 1st Rnd is the only Rnd that is joined.  Do not join at the end of Rnds 2 through 22, use a stitch marker to mark your 1st st.

Directions:

Rnd 1:  Ch 12, 3 sc in 2nd ch from hook.  Sc in next 9 chs, 3 sc in last ch.  Now working on the opposite side of the ch, sc in same 9 chs, join with a sl st to 1st sc.  (you have just crocheted an oval shape)

Rnd 2:  Ch 1, (sc, dc) in same sc as joining.  (sc, dc) in next 2 sc.  {skip next sc, (sc, dc) in next sc} 4 times.  Skip next sc, (sc, dc) in next 3 sc.  {skip next sc, (sc, dc) in next sc} 4 times.

Rnds 3 - 22:  (sc, dc) in each sc around.  At end of Rnd 22 join with a sl st to 1st sc, end off.

Add a chain loop to the back and a button to the front if desired.


***Debi Y's version***
Print Friendly and PDF

Wednesday, June 8, 2011

~ popcorn hexagon ~

 
Posted by Picasa

~~can I have butter on that?

Materials:
- 4-ply ww acrylic
- J hook

Size:  6 1/2" side to side or 7 1/4" point to point

Notes:
- ch 2 at beginning of Rnds 1 & 2 do not count as a stitch
- I crochet tight so you may want to adjust the size of your hook
- 3 dc popcorn st = 3 dc in st, pull up loop and remove hook, insert hook in 1st dc and in dropped loop, yarn over and pull through.

Directions:

Rnd 1:  Ch 3, 12 dc in 3rd ch from hook.  Join with a sl st to 1st dc.  (12 dc)

Rnd 2:  Ch 2, 2 dc in each dc around.  Join as before.  (24 dc)

Rnd 3:  (ch 3, 2 dc) in same dc as joining, pull up loop and remove hook, insert hook in top of chain and in dropped loop, yarn over and pull through, ch 2.  *popcorn st in next dc, ch 2.  Repeat from * around.  Join with a sl st to top of 1st popcorn st. 

Rnd 4:  Sl st into ch-2 space, ch 1, sc in same space, ch 2.  *sc in next ch-2 space, ch 2.  Repeat from * around.  Join with a sl st to 1st sc.

Rnd 5:  Sl st into ch-2 space, (ch 3, 2 dc, ch 2, 3 dc) in same ch-2 space, ch 1.  *skip next ch-2 space, 3 dc in next ch-2 space, ch 1, skip next ch-2 space, (3 dc, ch 2, 3 dc) in next ch-2 space.  Repeat from * 4 more times.  Ch 1, skip next ch-2 space, 3 dc in next ch-2 space, ch 1, skip next ch-2 space, join with a sl st to top of beginning ch 3.

Rnd 6:  Ch 3, dc in each dc and ch-1 space around with (dc, ch 2, dc) in each corner space.  Join as before.  End off.

***Debi Y's version***
Print Friendly and PDF